Offline information usually has a source, along with a path to get to it. For example, finding a book in a library involves finding the call number, then the appropriate floor, bookshelf, and so on. It’s easy to set up online content this way, too: as paths branching out to nodes. One might put a link to the syllabus on the course page, and then direct students to the course page to retrieve the link. The syllabus itself can link to further course content, like the site hosting lecture videos.
But there is a problem with the tree-like or branching setup. It expects that users of the websites will, like me, find the links/paths intuitive to navegate. But if users have different intuitions about the paths to content, or the interrelation of the content itself, they are likely to become frustrate. In the worst case, they may even miss out on information altogether.
Instead, I’ve adopted a web-like setup for links: just about everything links to everything else directly. So the syllabus links to all the course pages, and all the course pages link to each other and back to the syllabus. That way, there is more than one way to get to every course item (lecture videos, syllabus, Piazza page (more info on that), etc.). In general, each item is only one click away from any other.
Similarly, if in a lecture I mention something that came up earlier, or I remark that a topic will be dealt with later on, I can add pop-up cards that link to the relevant past or future lecture. I have also created multiple different playlists of lectures: in addition to the master playlist (chronoligically ordered, and including all the lectures), there is one for conditionals only, one for non-standard logics only, and so forth.
This way, all the lectures are interwoven, and can be directly accessed from each other along lines of relevance as the student pleases. Granted, sometimes the pop-ups can only be added later, once the later lectures are made. Still, in an asynchronous course, students often rewatch videos to study. And once the lectures are made and the links established, they’re all set for subsequent semesters.
Hence it’s best to set up links in an interwoven or web-like way. Notice too that setting up content like this is not so straightforward in fully offline contexts. This, then, is another significant advantage that teaching online has over its offline counterpart. And so it is another thing that we should make part of our new normal.
My videos have gotten much better since I started making them back in May, and I want to give a quick rundown of how I learned to improve them. Here’s one of the first lectures I produced:
Here are some conspicuous flaws:
My face in the lecture-board portion of the video is down in the scrubber bar; it’s also an awkward shape.
The lighting in the lecture (after the intro) is terrible.
The white background is too high contrast with the slate-coloured board.
The pens bar is visible above the board, and is also too high-contrast with the board.
The video lacks a good thumbnail: I’ve just used a clip from the video, rather than making one.
The microphone picks up the sound of the subway running underneath.
The audio in the intro is fuzzy.
How I fixed these problems:
I figured out how to move and reshape the face thumbnail in Camtasia: once you select it, the tools are at the top centre, above the screen. I made it into a square, and raised it to just beneath the middle-right. (By the way, it’s vital to do this before editing anything else in the video, since if you split an event to remove a pause (discussed here), then you’ll have to resize & reshape the thumbnail in two events. Better to do it at the outset when the whole lecture is just one big undifferentiated event, and do the splitting later).
I moved to another place in the building with natural lighting, and set up my equipment so I could lecture while facing the window.
I set a chalkboard behind myself to lecture in front of. This gives it a nice smooth and natural look, and contrasts nicely with the slate board.
In the editing stage, I placed a blank annotation over the pens portion at the top of the screen. Ordinarily, annotations are like stickers that allow you to add text boxes to the video. But I just deleted the text, set it to run the length of the whole lecture, and made it the same colour as the slate board (the hex code is #1e1e1e. In general, if you need a colour code, you can take a screenshot and upload the image to a website like imagecolorpicker.com, which will give you the info you need).
I started taking photos with the same setup as my introductions, and adding text to make custom thumbnails. (I discuss the rationale for thumbnails here).
I moved higher up in the building, and placed a small cushion underneath the microphone (you can see the setup here). (Originally, I had planned to use rubber bands and a cardboard box to suspend the microphone itself, so that the rubber bands would absorb any shocks and vibrations. But life is short).
I got a directional microphone that works with my phone. (I discuss this here as well).
I wish I knew all these things at the outset, but there you go. Here is the final lecture of the course:
Lecturing to a camera is weird. Often, it feels like speaking into the void. In an asynchronous course, lectures are posted online and can be viewed at any time. One makes a lecture, then edits and posts it, and students view it whenever. There is, in this way, a separation of lecture and reception, which can be profoundly alienating for teachers.
This is more something to be mitigated than solved, and I mitigate it with a little ritual: once I’ve collected my notes, I try to get some brief social interaction before making the lecture. This often amounts to chatting with a colleague, ideally about the material itself. And once the lecture is done, I give myself a little reward—usually a coffee—which gives me a feeling of completion, and gives me something to look forward to. This might seem relatively unimportant, but the kind of regularity it provides becomes vital right around the midterm mark. The ritual is comforting, and gives structure to something that would otherwise feel chaotic and open-ended.
Apart from that, I’ve also had to develop very different techniques for lecturing to a camera rather than a classroom. Old techniques like reading notes, or writing on the board while speaking, are habits. We picked up these habits in face-to-face contexts, where they make good sense. But they are ill-suited to teaching online. I wrote about the reasons for this, and about the new habits I’ve had to learn, here.
I miss talking with students immediately after class. In face-to-face contexts, students often use this time to bring up tangentially related questions, or to ask questions they were too shy to ask in class. Not only is this helpful for students: it also gives teachers a read on student uptake of course content.
So how can we replace this online? I use a combination of Piazza and optional lecture videos on YouTube (here’s why YouTube, and here’s why Piazza). When a student asks a deep or searching question, I respond in the form of a brief lecture vide. For example, students are often puzzled by the material conditional (as well they should be). Many true material conditionals (that is, conditionals that don’t go from a true antecedent to a false consequent), look weird. For instance:
If logic is fun, then grass is green
This troubled a number of students, and so I made a brief optional video on strict conditionals: how they’re meant to address problems presented by the material conditional, and how they face problems of their own. Here’s the video:
Now I stress that these videos are optional: students don’t have to watch them. But many of them do anyway. And I hope it gives them a feeling of ownership of the course: this is their video, in a sense, because it is a development of their question. It also gives me a chance to go on digressions that would not be possible in a face-to-face setting—digressions we used to have right after class.
There’s a further reason to make these. Logic is weird. In my experience, it’s best to be up front about this fact. For instance, you might find the material conditional odd. Or you might think it’s weird that predicates are sharply delimited (so that any object either is or isn’t tall, full stop). Or you might balk at the fact that constants must name existent objects (so there are no names for santa or pegasus in our language).
But thinking these aspects of classical logic are strange is by no means a sign you don’t understand logic at all. Quite the contrary: students’ intuitions about the strangeness of classical logic often map onto motivating intuitions for other logics. For instance, fuzzy logic for vague predicates like Tall, and free logic for constants like santa and pegasus.
I use optional videos to drive this point home: if finding the rules of classical logic weird is a sign you don’t understand it, then many logicians don’t understand logic either. I want students to hang onto their intuitions, perhaps take further courses in logic and develop their ideas, and most of all to see the course as something they can take ownership of. Short optional lectures are the way I do that.
As I mentioned in an earlier post, I make my lecture videos focused and brief. The course is asynchronous, but I always upload them Wednesday evenings, so the students can count on that. Here, first of all, is the finished product:
Basically, the production of these videos comes in three steps:
Planning This stage is by far the easiest. In fact, planning recorded, non-live lectures is easlier than planning for live lectures: in a recorded lecture, I can pause for as long as I like while I think about what I want to say, and just edit out the pause later on (more on this in Editing, below). So typically I write up pretty cursory notes on the main points/headings, and the examples I want to use.
Now it’s easy to put off recording, in part because one never feels perfectly prepared, and in part because recording is intimidating. But I try to avoid this, and plan relatively little in advance. I find this also makes the recorded lectures feel less scripted.
In short, I recommend limited planning, and jumping into recording pretty quickly.
Recording Recording is all about setup: having decent equipment and lighting, and little ambient noise, is key. For equipment, I recommend at least a good microphone (see this post), and software designed to capture the screen, which you can use as a blackboard. A tablet for writing also helps (I have a Wacom Intuos). I use Camtasia as recording software, and OneNote for the on-screen presentation. These give me a nice dark blackboard, plus my video thumbnail in the corner. Here’s a screenshot:
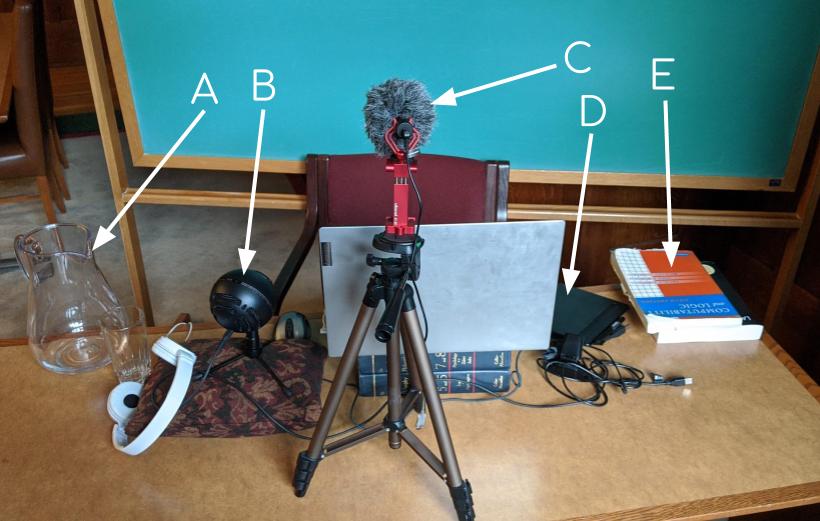
As for the actual setup, it’s best if you can face a source of light (ideally natural), and have a simple background. I set up a table facing a window, and put a chalkboard behind it. That way, when I sit at the table and lecture, I get a nice blue-green background in the thumbnail. Here’s a picture of the setup:
E: notes, notebooks D: writing tablet C: directional mic, and mount for recording outdoors (Ulanzi mount, Boya mic, Amazon Basics tripod, all of which can be bought on Amazon). B: condenser mic, resting on a cushion to reduce vibration from the street and nearby subway station A: water, which is key: a dry mouth is really audible on a condenser mic.
I had to break two major classroom habits when making these lecture videos.
First, I often look at my notes while I’m lecturing in class. But if I do this while recording, I end up looking offscreen, which looks a bit weird. Worse still, if I have to edit out a pause or error in the recording that occurs while I’m looking offscreen, my head jumps around in the thumbnail, since I am cutting out the frames in which I turn back to the camera. This looks really weird. So instead, I have had to develop the habit of pausing my speech, looking off camera to read my notes, then looking back at the camera before beginning to speak again. Artificial as this sounds, it’s amazing how natural it becomes after a week or two.
Second, I often speak while I’m writing on the board in the classroom. But in a lecture video, this looks and sounds choppy. And if I edit out the pauses where I’m writing and not speaking, it ends up looking really choppy, since the pauses are frequent, with only a few words between each. So, as with my notes, I have gotten used to splitting up the tasks: speak > pause > write > speak again.
Editing Editing is by far the most important stage. When lecturing, I have had to learn to rely on myself as an editor, and leture accordingly. For example, if in the course of a lecture I make an error, I just go back to the beginning of the sentence, and state it all over again, knowing that on the editing side I can cut the error out.
Similarly, it has taken me a while to get used to long pauses in lecturing, which would be awkward in a classroom setting. If I am a bit uncertain about an example or a way of phrasing things, I can pause for as long as I like just to think it through. A five-minute pause in recording is not really any harder to cut out than a five-second one, though it’s easy to feel anxious to get back to lecturing when you know the camera is rolling. It takes a bit to get over this feeling, but I did it by reminding myself that with a webcam, ‘film’ is basically free.
Once lecturing is done, I go into the Camtasia editing suite, which looks like this:
Setting aside the talking duck, the main elements here are (A) the media bin, and (B) the video/audio tracks. Adding something to the video is just a matter of dragging it from the media bin (A) and lining it up where you want with the tracks (B). The two tracks visible are the board with text on it (upper track), and the thumbnail with my face (upper track). In the upper track, you can see audio as well (represented by the little waves). If I wanted to snip out a pause, I would just highlight it in both tracks, and then press [delete]—much like deleting a line of text in a word processor. If you want to keep the tracks all aligned and gapless, like left-justified text, you’d click the little magnet at the lower left (you have to squint a bit to see it on this screenshot), which pulls everything to the left. This, then, is how I edit out pauses and errors. Finally, I add in illustrative animations and things to make the video more fun and engaging, like the quantified-over puppies in the video at the top of this post (more about animations and stickers in an upcoming entry).
Once all this is done, I go someplace on campus and record the introduction, using the mount and directional mic, which work with my phone (item C, in the image in the preceding section). I give these introductions to present the basic idea of the lecture in about thirty seconds, and also to give the videos a kind of casual campus feel. I used to record these before the lecture, but I switched to doing them afterwards, since I find I can summarize the lecture much more clearly once I have actually given it. (This is something I learned rather late: the order of production need not mirror the order of presentation, and in fact different orders of production are sometimes better).
Having wrapped up the editing, I make a video thumbnail (more on this here), and post the lecture to YouTube (here’s why YouTube), and write a brief description to accompany it.
For starters, the exam is open-book. This is the most straightforward way to make it fair for honest students, whose scruples would place them at a disadvantage on a take-home closed-book.* Better still, making the exam open-book allows me to ask tougher questions that presuppose deeper understanding of the material, since the students are free to look up the answers in their notes, the textbook, or online. For my part, I’ve learned a good deal writing exams of this sort: I didn’t know the answer going in, but I thought it through in the course of writing.
At any rate, the questions have to be of a sort that can’t be looked up online. For a logic course like the one I am teaching, one easy way to do this is to give an example of an argument in natural language, and then ask questions about its form. For instance, here is a question from the midterm:
Consider the following argument:
Maybe it’ll rain, and maybe it won’t. If it doesn’t rain, we should hold the picnic, because a picnic will make everyone happy. If we don’t hold the picnic, people will be sad. But if it does rain, we can always move the picnic indoors, and people will be happy with that. So we should go ahead with the picnic.
Which of the following best describes the structure of the above argument?
A. Proof by cases B. Disjunction addition C. Indirect proof D. None of the above
The correct answer is (A), proof by casess. But a question like this can’t really be Googled, since the argument is one I made up off the top of my head, and isn’t repeated in the same form elsewhere.
Making the exam open-book thus addresses the problem of solo cheating. What about groups of cheaters? If I wanted to cheat on this exam, I would set up a Zoom meeting with my collaborators, and we would go through it together. How can we disincentivize this approach?
Let’s take a closer look at the problem. As I see it, there are two ways of collaborating: peer-to-peer, or top-down. In a peer-to-peer environment, students are sharing answers among themselves. In top-down, one or a few students are dishing out answers to the larger group. I take it as pretty uncontroversial that peer-to-peer is not always bad, but that top-down is. And at least sometimes, peer-to-peer devolves into top-down. How can we prevent all this?
For an open book exam, this is a question of making illicit collaboration more difficult than just finding the answers in the book and lecture videos. To address this for the multiple choice exam, I have shuffled the questions and answers. So two students, α and β, will write the same exam but in different orders: question 1, answer A for α might be 11, D for β. From here, I can format the exam so that only one question is visible at a time. If α and β want to collaborate, they will have to spend a good deal of time figuring out which questions are which. Since the exam is timed, this is impractical.
Is all this perfect? No: committed cheaters will always find a way. But that was true when we were offline, as well.
P.S. if you’re curious about the whole exam, you can view the original, along with the solutions and rationale for the solutions, here.
____________________________________________________________ * Take-home closed-book exams are not always impractical or even unrealistic. I teach Latin at a seminary to classes of under five students, and I give them take-home closed-book tests and quizzes all the time. I tell them, “Cheating to become an engineer or doctor is shameful, but cheating to become a priest or monk is cosmic”. Mostly everyone finds this funny.
I’ve made it mandatory to ask any curriculum-related questions on the course Piazza page, rather than over email. I did this for two reasons:
I often receive several versions of the same question, so I’m copying and pasting answers in response emails, which is inefficient, and
The fact that I often receive several versions of the same question makes me wonder whether there are more students with the same question who just don’t ask, because they are too shy, etc.
Shifting the questions over to the course page addresses (1): students can see a question once it’s answered, and if they ask the same question again, I can link back to the original. It also addresses (2): students who might be too shy to ask will—I hope—feel less shy with anonymous posting. And even if they do feel too shy to ask, there’s a pretty good chance they’ll find the answer they were looking for anyway, since someone else will likely ask the question they had in mind.
Now I am fortunate enough to have three TAs for my 150 students. I have assigned the TAs different days to monitor Piazza. So each TA gets certain days of the week to answer the questions on Piazza. Right now, average response time to questions is 20 mins.
20 mins! I can’t even get ahold of someone at my bank in 20 mins…
Here, by the way, is how I arrived at the 95% estimation: I reckon that about one in 20 questions I get asked over email is not curriculum related. These are emails dealing with accommodations, etc., which it would be inappropriate to post in a common space like Piazza. Now that I’m down to just these, I am down 95%.
Granted, some of this is just offloading email load onto Piazza. But given the redundancy issue (1), I am still reducing email load by about half, in my estimation. And I am answering questions that students might not even have asked, because (2) they’re too shy.
It came as a surprise to me that a lot of students watch lectures at 2x speed. But this also makes things a bit weird: the audio is unpleasant, and it sounds a bit zany.
Better, then, to make the videos shorter. I accomplish this in two ways: first, I carve them up. Instead of posting one long lecture each week, I post six or seven shorter lectures, each on a specific topic.
Posting short, topic-specific lectures like this has an additional advantage: students who need to study up on one aspect of the course can find the relevant information easily. Since it’s in a dedicated video, they can just watch that, rather than skipping around in a longer video looking for the discussion they need.
Second, I heavily edit the videos: I cut out ums, ahs, extraneous noise, long pauses, and information that seems to me unclear, misleading, or downright useless. Editing them this way makes the videos denser, but since they’re on YouTube, students can watch them as many times as they like. And they can bring their questions to the course Piazza page, if need be (more on Piazza here).
The editing process is astonishingly time consuming: it takes me about an hour per (5 min) video. But the result is worth it.
Here’s the finished product: short, dense videos that zero in on specific topics:
UPDATE: it’s been pointed out to me that some institutions are less flexible with lecture lengths, and so the approach I’ve developed here won’t work everywhere. Still, chapter markers on the video progress bar provide a nice way to do something similar with a longer lecture video. Here’s a page that shows how to add these on YouTube.
Even though the lectures go up online, the class still has a scheduled block: Tuesdays, from 3-6. Since a lot of students signed up for the class before it was moved online and made asynchronous, it’s safe to assume they’re free at that time. So I scheduled tutorials for then. Hopefully, this serves the students well.
Students are often nervous to raise questions. Some of them shy away from it entirely. I always tell my students, “If you’re wondering about something, probably you’re not the only one”.* This is, I hope, encouraging. But it’s also really true, as I’ve learned from seeing how many ‘good question’ votes many questions on the course page get.
Since I want to make asking questions as easy and stress-free as possible, I’ve turned on anonymous posting on the course Piazza page. That way, students don’t need to worry that they’re being judged for not getting something obvious.
Now here’s an important point: most of our talk about online teaching presupposes that teaching in-person is better. And often enough that’s true. But anonymous posting is one way in which online is actually better than in-person, since anonymous posting makes students less nervous than they would be in the classroom. In fact I don’t know how I can do something comparable in the classroom when we go back, short of issuing ski masks. But I want to keep this advantage when we move back offline. So course pages are here to stay.
There’s a new normal for ya!
UPDATE: something strange started happening around the middle of the term: a few of the posts started taking a decisivley unkind tone. At first these were directed at frustrations with the online format. That was fine. But then they veered off into conspiracy theories about universities and grading policies, which raised some red flags for me. But the last straw was when one student belittled another’s question.
Originally, I allowed anonymous posting because I want people to feel free to ask whatever questions they want. But if they’re going to be shamed for asking by other students, it kind of defeats the point!
Here’s how I fixed this: I allowed a more limited sort of anonymous posting. Now, students can post anonymously to other students, though not anonymously to me. So far, it’s worked. And it still preserves the benefit of online posting, which is to allow students to ask questions they’d feel too shy to ask in front of others.
* Sometimes I also add the following encouragement: “so get those participation marks before someone else beats you to ’em!” Not sure how encouraging this is, though, but at least the students seem to find it funny.